
Do you find yourself struggling with iterating over tables in Excel using native connectors in Power Automate? The problem lies in the fact that these connectors require you to know the exact number of rows in the table beforehand, leaving you with limited options when working with dynamically changing data. But fear not, there is a solution to this frustrating problem that will allow you to effortlessly iterate over tables of any size, without having to manually count rows.
Step 1
For this solution, I am using the “When a new email arrives (V3)” Outlook trigger, as this is generally how Excel files are shared around; as attachments to emails. So go ahead and add this into your flow. Set the parameters here to your liking, such as only trigger when an email from X person arrives, or when an email arrives from X person but only those which contain attachments etc.
Step 2
After the trigger, go ahead and add a “Filter array” action. Let’s rename this to “Filter to Excel file” for ease.
In the From area, select the dynamic content from the trigger of “Attachments”. Next in this action, we need to perform a condition which the filter needs to meet; so add the dynamic content of “Attachments Content-Type” from the trigger, on the left hand side. Set the drop down to “is equal to” and, on the right hand side enter this:
application/vnd.openxmlformats-officedocument.spreadsheetml.sheetFor the geeks amongst you, all the below is doing is filtering to a particular MIME type; in this case, Excel files.
Your flow should then look like this:

Step 3
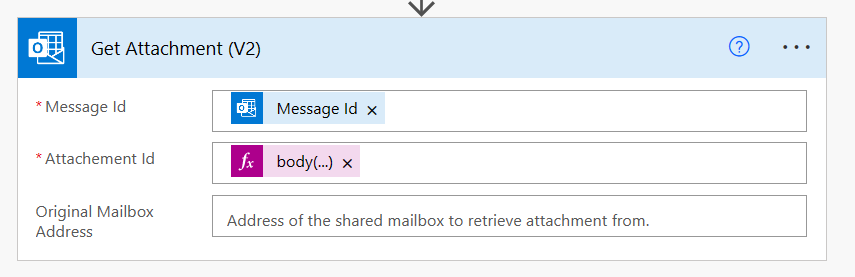
Next, add in the “Get Attachment (V2)” action. In “Message Id”, add the dynamic content of “Message Id”. For the “Attachement Id” (sic!), we’re going to need to use an expression. Here’s where things get interesting!
As an expression, copy and paste the following and hit OK.
body('Filter_to_Excel_file')[0]?['id']This is telling the flow to take the first item from the output of our filter array action, and grab the value of the ‘id’ property from it. This step will then look like the below:
Step 4
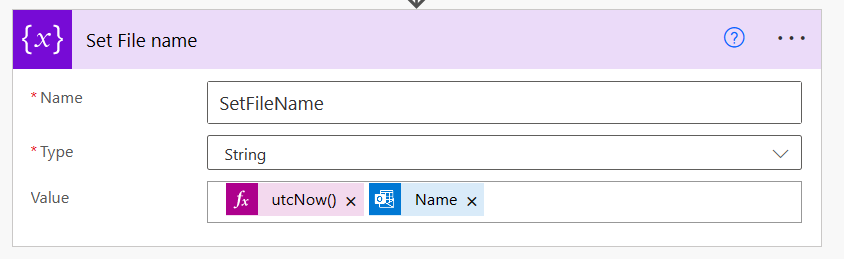
Add another action of “Initialize variable” and rename it to “Set File name”. Set the Name to “SetFileName”, of type String, and enter whatever you like really for “Value”; this will be your new file’s name which is created from the one emailed over. In my example, I put today’s date/time using an expression of:
utcNow()followed by the dynamic content of “Name” from the “Get Attachment (V2)” action.
You should end up with something like this:
Step 5
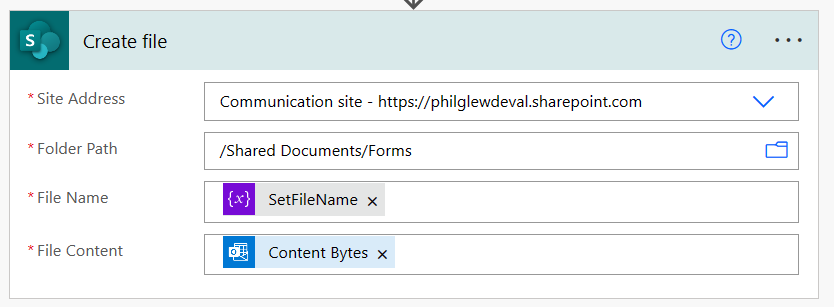
We need somewhere for our Excel file to live, so you will need access to a SharePoint site, or create a new one for this. Either way, add the “Create file” SharePoint action. Select the Site Address in the dropdown, and then select the Folder path you want your ingested Excel files to live in. For “File Name”, select the dynamic content of your “Set File name” variable action. For “File Content”, select the dynamic content of “Content Bytes” from the “Get Attachment (V2)” action. This step will then look something like this:
Step 6
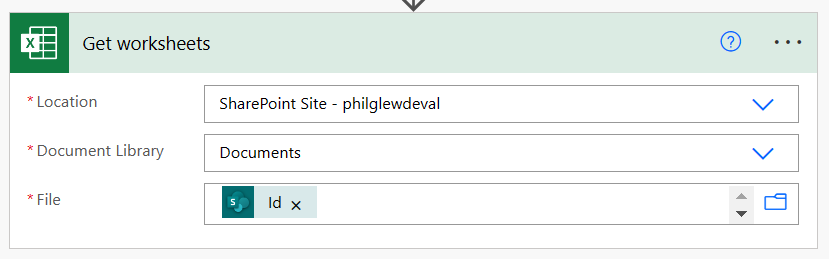
Next, add the “Get worksheets” Excel for Business action. Pick your SharePoint location in the dropdown (the same as the “Create file” action) and the Document library like your “Create file” action. But, for “File”, don’t click the little folder icon… we’re going to get clever… instead, add the dynamic content of “Id” from your “Create file” action. It should then look something like this:
Step 7
Now things get a little trickier – but bear with me – the end is in sight! For this step, we are going to need our SharePoint “siteId”. To get this, it’s actually pretty easy. Go to your SharePoint site (e.g. https://philglewdeval.sharepoint.com) and after this URL add on to the end the following:
/_api/site/idHit Enter. You will be given the very basic XML of this site. If you look towards the end, you will see a parameter called “Edm.Guid” followed by a GUID. This is your siteId! Copy this and paste it into Notepad for now.
Add an “Initialize variable” action, and rename it to “Initialize dataVAR”, give it the name of “dataVAR” and set the Type to “Object”. We need to write a little bit of JSON here, but don’t worry if you don’t understand each element; you can copy and paste. To walk you through this better, here is the completed action first and I’ll explain the content of each piece.
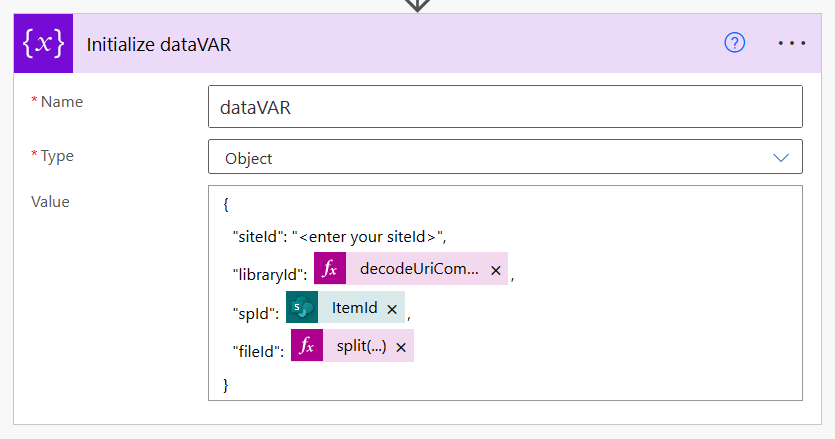
For “libraryId”, enter the following expression:
decodeUriComponent(split(split(body('Get_worksheets')?['@odata.context'], decodeUriComponent('drives(%27'))[1], decodeUriComponent('%27)'))[0])For “spId”, use the dynamic content of “Item Id” from the “Create file” action.
For “fileId”, enter the following expression:
split(split(body('Get_worksheets')?['@odata.context'], decodeUriComponent('items(%27'))[1], decodeUriComponent('%27)'))[0]Step 8
We now need to enter a loop, to iterate over all of the populated rows within your Excel worksheet. So, add an “Apply to Each” action and, under “Select an output from previous steps”, select the dynamic content of “value” from the “Get worksheets” action.
Within the “Apply to Each” action, add “Send an HTTP request” Office 365 Groups action. In “URI”, we need to make a Graph API request to get all of the populated rows within your worksheet. Again, here’s how it looks when completed, but just copy and paste each element in the order displayed in the URL itself:
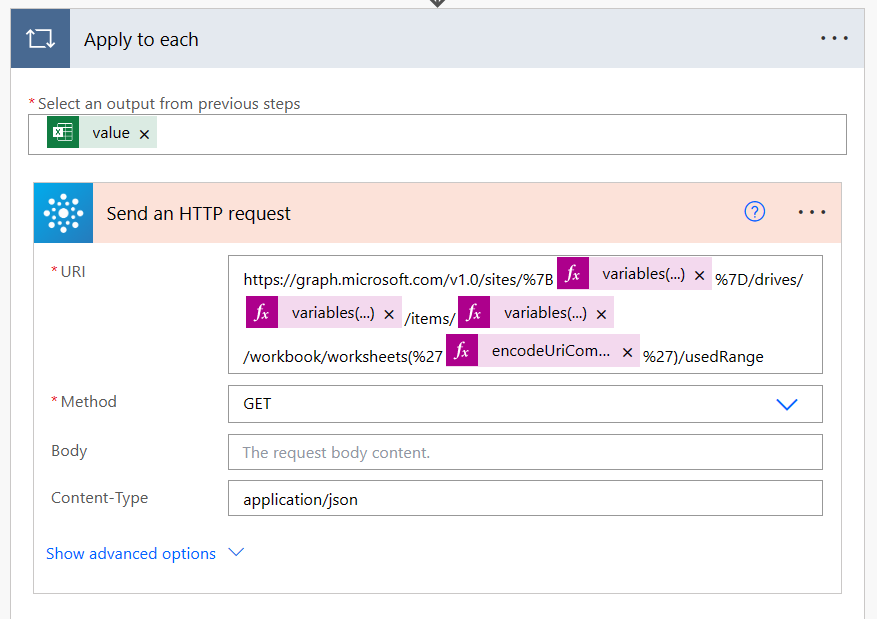
variables('dataVAR')?['siteId']variables('dataVAR')?['libraryId']variables('dataVAR')?['fileId']encodeUriComponent(items('Apply_to_each_worksheet')?['id'])Step 9
Save the flow and give it a test run. Once it’s run, open the output of the “Send an HTTP request” action. You will see LOTS of JSON here. Don’t worry, just copy the whole lot for now.
Add a “Parse JSON” action within the “Apply to Each”, your “Content” will be the dynamic content of “body” from the “Send an HTTP request” action. Then, click “Generate from sample” underneath “Schema”. Paste the JSON you copied from Step 9 and click “Done”.
Step 10
That’s all there is to it. Of course, you will now want to use this data for something most likely. To do this, you will need to add another Apply to Each loop or condition, and use an expression of the below as the “Select an output from previous steps”
bopy('Parse_JSON')['values']Note the above does not include a query parameter of ‘?’ before the “[‘values’]” element.
Then it’s over to you; you could use the “Add a new row” Dataverse action to add the Excel data into Dataverse, or filter the data down further based on anticipated values.
Enjoy!